Wednesday, March 27, 2019

Birthday Toppers - use up scraps and extra embellishments

Good afternoon, all.  I have found a new charity that needs birthday toppers for zip lock bags.  Sounds a bit weird, but this charity fills a gallon zip lock bag with birthday goodies and distributes them to children whose birthdays might otherwise be overlooked.  This just pulled at my heartstrings!  So, I am making birthday toppers in between my cards.  It is a fun break and it uses up extra papers and embellishments.  Now, for all of you who already donate cards to me for my other charities, please note - I am not collecting these like I collect cards.  I will post the info at the end of this section so that if you are interested, you can make some toppers and send them in to the charity itself.  First, some pics of what I have made:


Aren't they fun?

Unfortunately, when I went on to the web site, there were very few instructions.  This is what I know:
Start with a 11 x 8.5 piece of paper.  I use the 65 lb. weight in colors or just white.  Cut 1/4" from the bottom to make it 10.75 x 8.5.  Cut this piece in half length wise.  Now you have two pieces of paper, each  10.75 x 4.25.  Fold each piece in half length wise and you have two toppers, ready to be decorated in any birthday way.  I just decorate one side.  I do not know how they attach these to the zip lock bags.
If you are interested, here is the charity:

BRIGHTER BIRTHDAYS
3 Central Plaza  #383
Rome, GA 30161

Tip of the Day:
I know I say this a lot, but please remember - line the insides of your cards if the base is not white or ivory.  Even pastel colors and tan need to be lined.  
Thank you for stopping by today.
Hugs, Jill

Tuesday, March 5, 2019

March Madness

Good morning.  This past weekend was so beautiful and balmy, hubby and I spent it working in our gardens.  We pruned, trimmed and mulched and made everything look so nice.  The flowers were blooming and Spring looked near.  Then, last night the freezes came.  Oh, my. We tried to cover our orange tree which of course is in full bloom but sometime during the night the winds took the cover off.  I am afraid to go look and see what the damage is.  The best laid plans of mice and men...

Today's post is in reference to a commission I had a few weeks back.  The founder of one of the charities we send cards to referred me to a friend of hers who owns a AirB&B in Paris, France.  I was unaware of this until I received an email from this woman who asked me to do a cover for her Guest Book.  At first I panicked - I always hesitate to do commissioned work because what if they don't like it in the end and are too afraid to tell me?  I finally decided that if she didn't like it (and mind you, she has never seen anything I have ever created) then she didn't have to pay me.  I went online, found her property and printed off a picture of her building.  That became the background of her cover.  I did some geli pulls on top and then printed off the tower and words.  I actually made 6 different pieces and offered her a choice.  This is the one she chose and seemed to like....


If ever you get over to Paris, I have a recommendation for where you can stay.  LOL.

Tip of the Day:

This tip comes from one of my friends that I haven't met yet (aka card maker donor), Kayte W., and sounds like very good advice.  I am headed out today to check this out.  If you use the mirror cardstock (I am assuming she is talking about the glossy silver, or red or whatever colored cardstock), instead of using the sheets you can buy in a package for lots of money, go to the section where the posterboard sheets are carried and buy on of those.  It will be a lot cheaper.  Anything to save a little money, right?  That's it for today.  Thanks for stopping by and have a great week.

Hugs, Jill

Saturday, February 16, 2019

STAMPING GADGET

Good morning.  I have been asked if I believe the STAMPING TOOL that sorta looks like an acrylic box is worth the money.  (There are several brands out there and I am not pushing any particular one.  In fact, my last one I bought at Tuesday Morning on the cheap!)  My answer is un unequivocal YES!!!  I really don't know how I managed to stamp without one.  Yes I do - I made mistakes and had to throw away many not so good images. With this stamping tool, if your image is not printed dark enough, or if some of the image did not print, you can re-stamp over it because the stamped image always stamps in the same place.  Here are some examples:

First stamping effort did not print dark enough:


 I stamped it twice more.  Big difference.

 This one wasn't anywhere near what I wanted:
A second stamping made it perfect.

In my humble opinion, this tool pays for itself many times over.   I currently own three and use all of them all the time!


TIP OF THE DAY:
Although I do some stamping in colored ink, the majority of my images are stamped in black ink.  Do you know that the ink refill bottles that you can buy at your local office supply store work great?
 I use the same ink if I heat emboss or not, and this ink works wonderfully well.  For those who sell the specialty inks, sorry, but by buying from my office supply store, I save bunches of money.  And that's what I like best - whatever I save on ink goes toward other fun supplies!  My store also carries blue and red ink refills so when I need those colors, that's where I buy them.  No, there is not a lot of variety, but I am a basic sorta gal and these do just fine by me.

Hope you enjoyed today's post.  Thank you for stopping by.
Hugs, Jill


Monday, January 14, 2019

NEVER UNDERESTIMATE THE POWER OF SCRAPS

Happy 2019 to one and all.  It took me a while to get back into blogs and card making but I am indeed back.  Hope everyone has a terrific 2019.

I have added three new charities to my list that I send monthly boxes of cards to (with your generous help) - two different organizations that send cards to children and adults in hospitals or in hospice, or who have suffered trauma (such as the recent school shootings) and one military group who sends the cards to our deployed troops.  All three of these groups have responded very positively to our cards and are very excited to receive them.  I was making general cards today and had just enough of these butterfly and striped papers to make 5 card backgrounds.  Loved the colors together:


But, I had made 7 hearts so I needed 2 more backgrounds.  Using the scraps, I pieced together this one:


 Then, taping together the "crumbs" of paper I had left over, managed to get one more background for that last heart:


Needless to say, I didn't have any paper left over to throw away.  Good thing I hadn't made 8 hearts!
So, that's it for today.  Going back to the craft room to make some more cards.

TIP OF THE DAY:
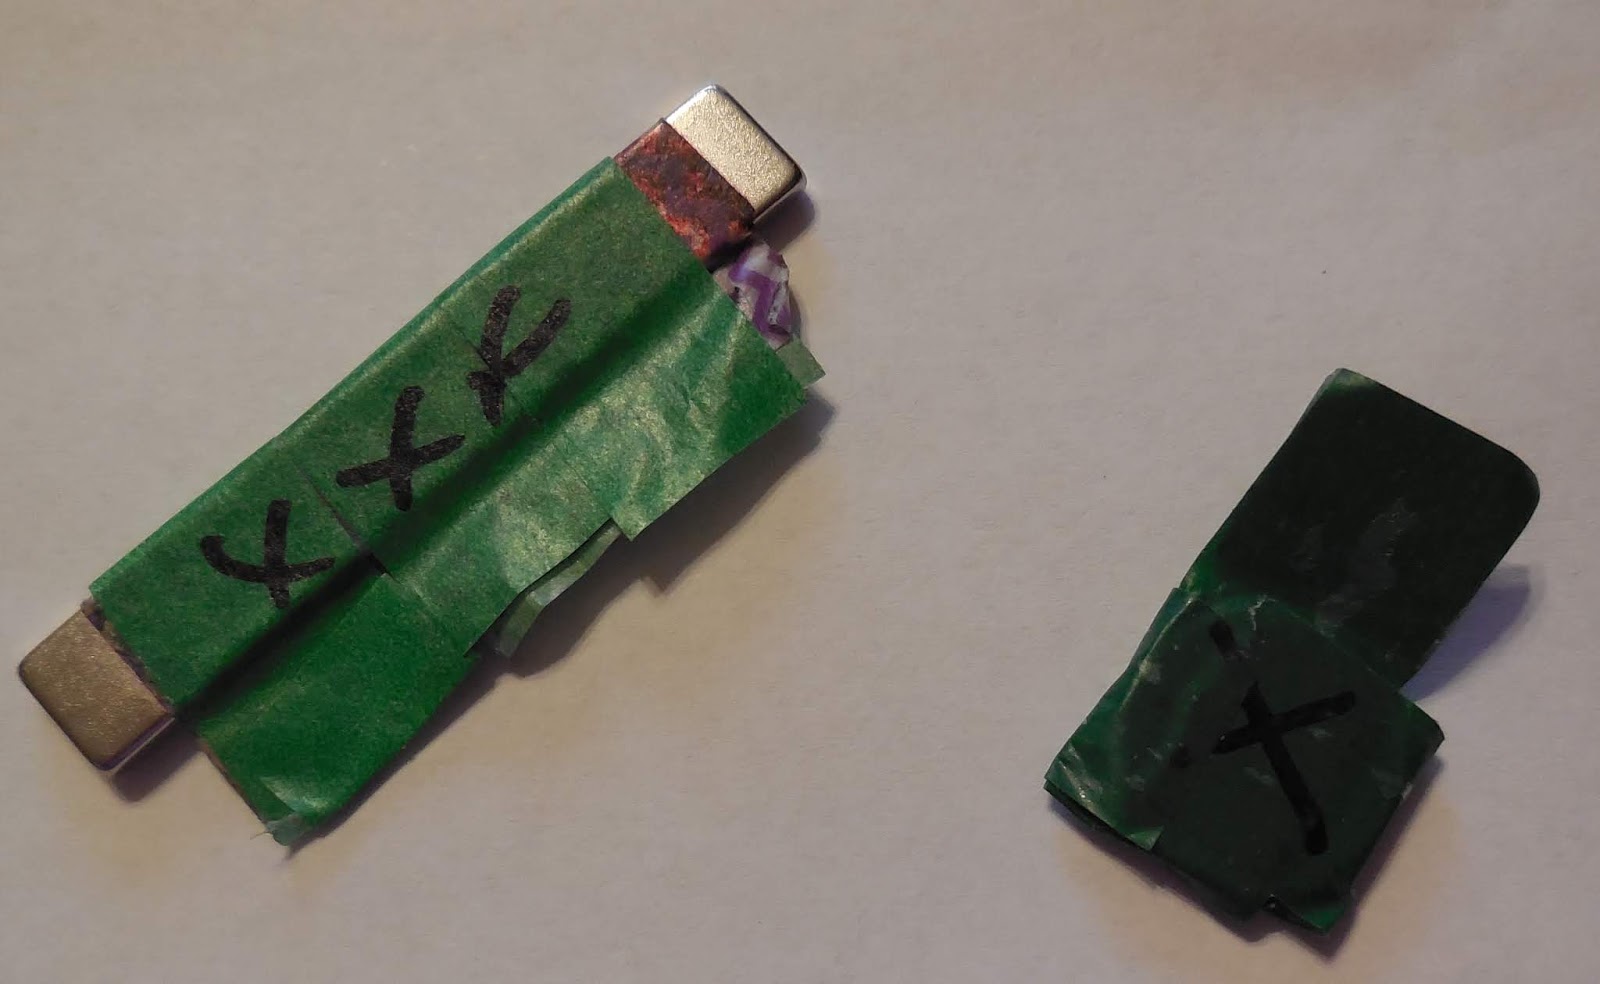
For those of you who use the stamping tool that looks like an acrylic book and uses those strong but fragile magnets, have you applied washi tape to them yet? This serves several purposes.  First, although these magnets are very strong magnetically, they are extremely fragile and break quite easily.  I lost several when they snapped together and broke.  They are a bit expensive to replace. Then, I decided to wrap them in washi tape and haven't had any break since.  And yes, I still occasionally get careless and they snap together.  By leaving a tail on the end of the tape, it is much easier to pull them apart when they do crash into each other.  Also, I mark an "X" on the tops of mine so that I always put that side up on the paper.  That way, if ink gets on the top of the magnet, I don't accidently place that inky side on my card or paper that is to be stamped.  Try it and see if it isn't easier to use this way.  When the tape gets inky, just replace it.  I have used duct tape as well, but the washi tape is a little easier to remove when you want to replace it.


Thank you for stopping by today.  Hope you enjoyed...
Hugs,  Jill


Friday, December 14, 2018

Holiday Greetings

Happy almost Holidays, everyone. 

 I just wanted to finish up 2018 with a big thank you to all who read my blog and/or donate cards to all the charities I support.  I know that I could not fulfill their needs if it were not for your giving hearts and willingness to share your talents.  I do hope everyone has a stress-free few weeks.  No matter what your plans, take time to enjoy your family, your friends and all your blessings!  I know I count each and every one of you as a major blessing in my life.  


Hugs to all - Jill

Tuesday, November 20, 2018

BUMBLEBEE BABY SHOWER

Oh, my goodness.  That was one fun shower.  Not only did I have a blast making and preparing for the shower, but everyone seemed to have a great time at the shower itself!  I showed you the invites last blog and now for pics of my decorations.  Everything was made by me over the last few months.  I tried to keep up with the card making as well, but if it had not been for the generosity of all of you donors, I'm not sure how I would have been able to meet the charities' needs.  Thank you for all your support and cards!  Now, for some pics.
If you remember, Kelly and Jordan do not know the sex of their baby and will only find out when it makes its appearance.  So, they call the baby-to-be their little bumblebee.  Thus, the theme of the shower.


And that's it.  Hope you enjoyed.  
Happy Thanksgiving to all.  I am so thankful
for all the friends I have made through card making.
I wish I could give each of you a hug - stay healthy.
Hugs, Jill

Thursday, October 11, 2018

FALL is Finally in the AIR

Yes, indeedy - it finally feels like fall outside.  I don't know how long it will last, but we are loving it.  Hope my friends in the recent hurricane hit areas are doing O.K.  I have heard from a few of you saying you are doing fine.  All of you are in my thoughts and prayers.

I am super busy these days.  As I may have mentioned, my niece is expecting her first baby in January and I am throwing her a baby shower next month.  She and hubby do not want to know the sex of their child in advance, so they call her/him Bumble Bee.  Thus the theme of the shower.  I am having a blast making decorations but can't post pics of them yet as I don't want Kelly to see.  Here is the invite and the thank you cards I made.  Since they are already mailed out, and the thank you cards delivered to her, I can share.  However, I forgot to take a picture of the inside of the invite and as I said, they are all mailed out.  At some point I will get a picture and post it.  In the meantime...


For after the shower, thank you notes...


 After the event, I will post pictures of the decorations.  I'm having a lot of fun.  BUT, this is taking time away from card making for my charities.  So, my plan is simple - I am making as many CAS (clean and simple) cards as I can to refill my stock, which has dwindled to almost nothing.  As you can see, these are very simple, yet I hope, cheerful.  I am using left-overs from other cards and scraps - left-over images, left-over shapes, left-over backgrounds, etc.  I tried to use as much as I could from my odds and ends drawer.  Once I am finished with the shower planning, I will resume the more intricate cards.  I laugh because as you know by now, my "intricate" cards are still what I classify as CAS.  These will just have more layers.  LOL


TIP OF THE DAY:  Forgive me for repeating myself, but I think this is important.  Any card that does NOT have a white or ivory card base needs a liner inside for writing purposes.  The people who use these cards (meant for the charities) often use a pencil, and a pencil is hard to see on colored papers.  So, yes, even light colors and yellow need a white liner.  
Thank you for stopping by today.
Hugs, Jill


Saturday, September 15, 2018

Christmas Challenge Results

Thank all of you who participated in my very informal "Christmas Challenge".  The folder we used to create our designs had very limited possibilities and I am amazed at the creativity used by these card makers.  Check them out:

Barb cut her layer into pieces and made banners out of them.  Original thought...

 Betty overlaid the embossed design with gems and ornaments, embellishing some of the embossed lines with gold paint.  Love the idea....


Jan fussy cut ornaments and raised them.  Gives a depth to the card.....

Kelly used large ornaments to bring the focus to the center of the card where the shiny color is.  Love me some bling.....

Lori also used cut out ornaments - the lacy type - to bring interest to the background.  She "hung" the ornaments with ribbon....


 Ruby used layers and banners to break up the background and bring interest to the card.  I like the pastel colors - they go so well with the peaceful sayings....


 I like the way Roberta used multilayer ornaments to "copy" the intricate embossed ornaments.  And the hooks add a really neat touch to the design....

And my two:

On this one, I moved the folder over after embossing the first time, to fully emboss the entire  layer...…
 Well, that was loads of fun.  I love seeing how others use the same supplies, applying their own personal touches and ideas.  Thank you again for playing along.  

 FOLLOW UP FROM LAST TIP OF THE DAY:
Check out the garland the snowman is holding.,  I used the plumber's washer rubber to cut out little bitty stamps to stamp the hearts, trees and stars.  I know - overkill, but I had fun.  I did use a very sharp xacto knife instead of scissors since the pieces were so very small.


And now, the real TIP OF THE DAY:
Let's talk paper.  I have talked about the different weights of papers before, but what I might not have mentioned was that all brands of paper are not equal.  I keep suggesting that the best paper weight to use for the card base is 110 lb. paper.  I use the 110 lb. from Michael's as it is sturdy and comes in a rainbow of colors.  Yes, it is expensive at $14.99 a package, but I always use a coupon and spend only $7.50 per package.  Now, I did buy some 110 lb Georgia-Pacific paper from my local big store only to discover that it may say 110 lb. but it is thin and too flexible.  It is more like 65 lb. paper.  65 lb. paper is great for layering, but as a card base, doesn't hold up very well.  I have been told by several of the charities that the kids who receive our cards treasure them and hold on to them for a very long time.  They often carry them around in their robes or pockets or backpacks.  Therefore, the sturdier the card base, the longer they last.  Here is the three types of papers I use for my cards -
Card Base - 110 lb. from Michael's
Layers - 65 lb., also from Michael's but found many places
Inside linings - 28 lb. copy paper which I buy at Office Depot.  I find regular copy paper at 20 lbs. is a bit thin.  It does work but the thicker 28 lb. gives a more professional look.
All of the above is just what I use - suggestions if you want to follow them.  NOT requirements!

Thank you so much for joining me today.  Hope you enjoyed!
Hugs, jb